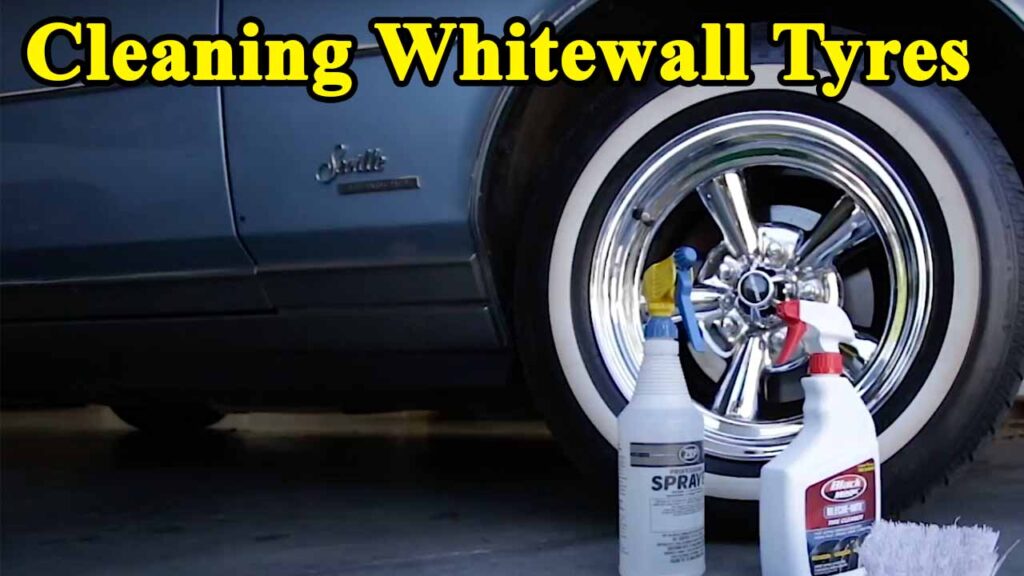
Whitewall tires are more than just rubber; they’re a signature, a nod to an era when automotive design embraced flair and sophistication. From lowriders cruising down Main Street to classic cars gleaming at a weekend show, the crisp contrast of a brilliant white stripe against the black rubber is simply iconic. But unlike their all-black counterparts, whitewalls demand a bit more tender loving care to retain their dazzling appeal. This comprehensive guide will equip you with the knowledge, techniques, and insider tips to keep your whitewalls looking showroom-fresh.
Why Whitewalls? A Timeless Appeal
Before we get our hands dirty, let’s appreciate why we go through the effort. Whitewall tires originated in the early 20th century, a byproduct of the manufacturing process where zinc oxide was used as a white filler in the rubber for strength and durability. Over time, it evolved into a deliberate design choice, symbolizing luxury and style. Today, they evoke a sense of nostalgia, rebellion, and individuality.
However, their open-pored white rubber is highly susceptible to staining and discoloration. Road grime, brake dust, tire dressings, and even UV exposure can quickly turn that crisp white into a dull, yellowish, or brownish mess. This is where our expertise comes in.
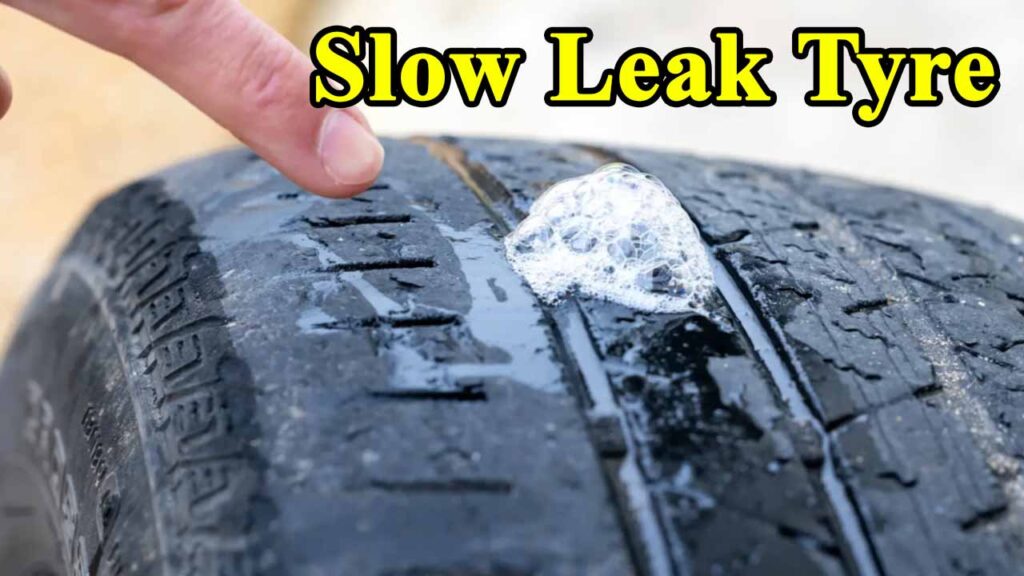
The Silent Thief: Unmasking the Mystery of the Slow Tyre Leak
The Enemies of Brilliance: What Stains Your Whitewalls?
Understanding the culprits is the first step to effective cleaning:
- Brake Dust: A notorious adversary. Composed of metallic particles and carbon fibers, brake dust is highly corrosive and adheres stubbornly to surfaces, leaving unsightly brown or black streaks.
- Road Grime & Tar: The everyday assault from asphalt, oil, and general road debris.
- Tire Dressings/Silicone Sling: Many tire shining products, especially those with high silicone content, can “sling” off the black rubber onto the whitewall, attracting dirt and causing yellowing. This is a common mistake I see many car enthusiasts make.
- Rubber Bloom (Blooming): This is a natural process where antioxidants and waxes in the tire’s rubber migrate to the surface to protect it from ozone and UV degradation. It can appear as a brownish or yellowish film on the white rubber. It’s a sign the tire is healthy, but it needs cleaning.
- UV Exposure: Prolonged exposure to sunlight can lead to oxidation and yellowing of the white rubber.
The Whitewall Cleaning Arsenal: Essential Tools and Products
You don’t need a professional detailing setup, but having the right tools makes all the difference:
- Dedicated Whitewall Cleaner: This is your primary weapon. Look for products specifically formulated for whitewalls. My go-to is often a heavy-duty degreaser or a purpose-built whitewall cleaner. Avoid harsh degreasers not meant for rubber, as they can dry out and crack the tire.
- Stiff Bristle Brush (Non-Metallic): A sturdy brush is crucial for agitating the dirt. I prefer a dedicated tire brush with plastic bristles. Never use a wire brush, as it will scratch and permanently damage the white rubber! I learned this the hard way on a set of tires years ago – a costly mistake.
- Microfiber Towels or Rags: For drying and final wiping.
- Bucket(s): For water, especially if you’re doing a full wash.
- Garden Hose with Spray Nozzle: For rinsing.
- Optional: All-Purpose Cleaner (APC): A diluted APC can be effective for lighter cleaning.
- Optional: Fine Steel Wool (0000 grade) or Magic Eraser: For stubborn stains, used with extreme caution and only on the white section. More on this later.
- Gloves and Eye Protection: Always prioritize safety.
The Step-by-Step Guide to Sparkling Whitewalls
This is my tried-and-true method, perfected over years of detailing:
Step 1: Pre-Rinse – The Initial Attack
- Before applying any cleaners, thoroughly rinse the whitewalls with water from your hose. This removes loose dirt, dust, and helps to cool the rubber, preventing cleaners from drying too quickly. Make sure the tires are cool to the touch. Cleaning hot tires can cause the cleaner to evaporate too fast, leaving residues or even staining.
Filling Tyres With Foam: An Expert’s Guide to Flat-Proofing Your Fleet
Step 2: Apply Your Chosen Cleaner – Let the Chemistry Work
- Spray your dedicated whitewall cleaner generously and evenly onto the entire white section of the tire. Don’t be shy.
- Crucial Tip: Let the cleaner dwell for 30 seconds to a minute (or as per product instructions). This allows the chemicals to break down the grime and stains. Do not let it dry on the tire.
- Personal Touch: I often find that for really neglected whitewalls, a second light application after the first agitation can be beneficial. It’s like giving it a one-two punch.
Step 3: The Agitation – Elbow Grease Time!
- With your stiff-bristle brush, vigorously scrub the whitewall in a circular or back-and-forth motion. You’ll immediately notice the dirt and yellowing starting to lift, creating a brownish foam. This is incredibly satisfying!
- Pay extra attention to the edges where the white meets the black rubber, as dirt tends to accumulate here.
- Expert Insight: The mechanical action of scrubbing is just as important as the chemical action of the cleaner. Don’t be afraid to put some muscle into it.
Step 4: Rinse Thoroughly – Wash Away the Grime
- Immediately after scrubbing, thoroughly rinse the whitewall with clean water. Ensure all traces of the cleaner and the lifted grime are flushed away. Any residue left behind can lead to streaking or re-staining once the tire dries.
- Check your work. If you see any lingering stains, repeat steps 2-4. Patience is key here.
Step 5: Dealing with Stubborn Stains – The Advanced Tactics
Sometimes, even after repeated cleaning, you’ll encounter persistent stains. This is where advanced techniques come in, used with extreme caution:
- Magic Eraser (Melamine Foam): For light to moderate stubborn stains or yellowing, a damp Magic Eraser can work wonders. Gently rub it over the affected area. The abrasive nature of the melamine foam acts like a very fine sandpaper, carefully abrading the stained layer. Use sparingly and only on the white portion.
- 0000 Grade Steel Wool: For the toughest, deeply embedded stains or heavy blooming, 0000 (quadruple ought) steel wool, used with a mild cleaner or even just water, can be surprisingly effective. This is an aggressive method and should be your last resort. Gently rub it over the stained area. The super-fine fibers carefully abrade the surface without causing visible scratching if done correctly. I’ve personally used this on vintage tires where nothing else would work, bringing them back to life. However, if you use too much pressure or a coarser grade, you risk permanent damage.
- Test Spot: Always, always, always do a test spot in an inconspicuous area if you’re using Magic Eraser or steel wool for the first time on a particular tire.
Step 6: Drying and Protection – The Finishing Touches
- Once rinsed, let the whitewalls air dry, or speed up the process with a clean microfiber towel.
- Avoid Tire Dressings on Whitewalls: This is a golden rule! Most tire dressings are designed for black rubber and can cause yellowing or attract dirt to your whitewalls over time. If you want to dress the black portion of your tire, apply it precisely and wipe off any overspray immediately. Many professional detailers will tape off the whitewall when dressing the black side to prevent “sling.”
Maintenance is Key: Keeping Them Clean
The secret to perpetually pristine whitewalls isn’t just about intense cleaning sessions; it’s about regular maintenance:
- Wipe Down After Every Drive: A quick wipe with a damp cloth after a drive can prevent brake dust and road grime from settling in.
- Regular Light Cleaning: Every time you wash your car, give your whitewalls a quick scrub with a mild soap and water solution. This prevents significant build-up.
- Avoid Curb Rash: This goes without saying, but scraping your whitewalls against curbs is a sure-fire way to damage them beyond simple cleaning.
- Proper Storage: If storing your vehicle for extended periods, ensure the whitewalls are clean and dry. Consider covering them to protect against dust and UV rays.
Personal Experience and a Local Reference
I remember a few years ago, a client brought in his grandfather’s meticulously restored 1957 Chevrolet Bel Air, a true beauty that frequented local car shows like the “Cars and Coffee” meet-up at the Shoppes at Wiregrass here in Wesley Chapel. The car was immaculate, but the whitewalls had a stubborn, deep yellowing from years of old tire dressing that had oxidized. We tried everything – dedicated cleaners, multiple scrubs. Finally, after a careful test, we resorted to the 0000 steel wool, paired with a mild automotive cleaner. The transformation was incredible. The vibrant white returned, making the Bel Air truly pop. The client was ecstatic, and it just reinforced to me that sometimes, a little controlled aggression with the right tools is necessary for perfection.
Case Study: The Motorcycle Whitewall Revival
A local motorcycle enthusiast from Dade City brought in his vintage Harley-Davidson, whose whitewall tires were almost entirely brownish-yellow. He was preparing for the annual “Thunder by the Bay” rally in Sarasota. The tires looked beyond help. We followed the steps rigorously: a strong dedicated whitewall cleaner, vigorous scrubbing, and for the really embedded grime, a careful application of a Magic Eraser. The process took longer than expected – about an hour per tire – but the results were stunning. The white walls were restored to a brilliant white, complementing the bike’s chrome accents perfectly. He told me later that at the rally, several people commented specifically on how clean his whitewalls were!
Value (Price) of Whitewall Care
While dedicated whitewall cleaners might cost a bit more than generic tire cleaners (ranging from $10-$25 per bottle), the value they provide in preserving the aesthetics and potentially extending the life of your whitewalls is immense. Considering a new set of quality whitewall tires can easily run into hundreds, if not thousands, of dollars (especially for vintage sizes), a small investment in proper cleaning supplies is a no-brainer. The “value” here isn’t just monetary; it’s about maintaining the look and character of your vehicle.
Important Values and Originality
The originality of your whitewalls, especially on a classic or vintage vehicle, adds significant value. Maintaining their clean, white appearance is part of preserving that originality. A faded, yellowed whitewall detracts from the overall presentation, no matter how pristine the rest of the vehicle is. Our goal is to bring out that original, vibrant white.
FAQ: Your Whitewall Cleaning Questions Answered
Q1: Can I use bleach to clean whitewall tires? A: Absolutely NOT! Bleach is extremely harsh and can dry out the rubber, causing it to crack, degrade, and turn yellow permanently. It will also strip away any protective layers from the tire. Stick to products specifically designed for automotive rubber.
Q2: My whitewalls are yellow. Can they be restored? A: In most cases, yes! Yellowing is usually caused by rubber blooming, dirt, or old tire dressings. With the right cleaner and scrubbing, most yellowing can be significantly reduced or eliminated. Deeply ingrained yellowing might require the careful use of Magic Eraser or 0000 steel wool.
Q3: How often should I clean my whitewalls? A: Ideally, a light cleaning every time you wash your car, and a deeper cleaning session (like the one described above) once a month or as needed, depending on how often you drive and road conditions. Regular maintenance prevents heavy build-up.
Q4: Will cleaning my whitewalls damage the black rubber? A: No, as long as you’re using appropriate automotive-grade cleaners and non-metallic brushes, you won’t damage the black rubber. In fact, many whitewall cleaners are also effective on the black parts of the tire.
Q5: What’s the best tire dressing for whitewalls? A: The best “dressing” for whitewalls is usually no dressing at all on the white part. For the black rubber, choose a water-based, non-silicone tire dressing that doesn’t sling. Apply sparingly and wipe away any excess immediately. Many classic car enthusiasts prefer a matte, clean look over a glossy one for their tires to avoid any potential issues with sling or yellowing.
Conclusion: A Pristine Statement
Cleaning whitewall tires might seem like a niche task, but for those who cherish the classic aesthetic, it’s a vital part of vehicle ownership. It’s a hands-on process that connects you with your vehicle and allows you to appreciate the details that make it unique. By understanding the enemies of brilliance, arming yourself with the right tools, and following a consistent cleaning regimen, you can confidently maintain those dazzling white walls, ensuring your ride always makes a pristine statement wherever it goes. So, roll up your sleeves, grab your brush, and let those whitewalls shine!