Tackling a flat tire is a rite of passage for many drivers, and while changing a tire is a common skill, there’s a lesser-known but equally crucial step that often stumps even seasoned DIYers: breaking the tire bead. This isn’t just a technical maneuver; it’s the gateway to repairing a puncture or replacing a worn-out tire. As someone who’s spent countless hours wrestling with stubborn tires in garages and on the roadside – from my early days helping out at my uncle’s repair shop in Bakersfield to changing a surprise flat on a desolate stretch of Highway 5 – I can tell you that mastering this skill is immensely satisfying and incredibly practical.
This article will be your comprehensive guide to breaking a tire bead, transforming a potentially frustrating task into a manageable one. We’ll explore various techniques, from the classic DIY methods to using specialized tools, all while prioritizing safety and efficiency. So, grab your gloves, and let’s demystify the art of bead breaking!
What Exactly Is a Tire Bead, Anyway?
Before we dive into how to break it, let’s understand what we’re dealing with. The “bead” of a tire is the inner edge, reinforced with high-tensile steel wires (known as bead wires), that sits snugly against the rim of the wheel. When the tire is inflated, air pressure pushes the bead firmly against the rim’s bead seat, creating an airtight seal. This seal is what keeps your tire inflated and securely attached to the wheel.
Breaking the bead simply means separating this sealed connection between the tire bead and the wheel rim. It’s the first critical step before you can remove the tire from the wheel.
Why is Breaking the Bead So Challenging?
If it’s just an airtight seal, why is it such a struggle sometimes?
- Extreme Pressure: Even after deflating the tire, the bead can remain incredibly well-seated due to the immense pressure it was under.
- Rust and Corrosion: Over time, rust and corrosion can build up between the bead and the rim, effectively gluing them together. This is especially true in areas with high humidity or road salt, something I’ve seen countless times on older vehicles.
- Rubber Adhesion: The rubber of the tire bead can also adhere to the metal of the rim, creating a surprisingly strong bond.
- Tire Design: Some tire designs have a very tight bead fit for enhanced performance, which can make them more difficult to break.
When Do You Need to Break a Tire Bead?
You’ll need to break a tire bead in several common scenarios:
- Puncture Repair: The most frequent reason. To patch a hole from the inside, you must remove the tire from the wheel.
- Tire Replacement: When your tires are worn out, and it’s time for new ones.
- Wheel Maintenance: If you need to clean, paint, or repair your wheel rim.
- Tube Replacement (for tube-type tires): Less common in modern cars, but essential for certain vehicles and bicycles.
Essential Safety Precautions (Don’t Skip This!)
Before you even think about putting force on a tire, prioritize safety. I’ve seen my share of close calls due to carelessness.
- Deflate the Tire Completely: This is non-negotiable. Remove the valve stem core (using a valve stem tool, usually a few bucks at any auto parts store) to ensure all air is out. A partially inflated tire can violently release pressure when the bead breaks, leading to serious injury.
- Wear Eye Protection: Always wear safety glasses or goggles. Debris, rust flakes, or even a sudden release of pressure can cause eye damage.
- Wear Gloves: Protect your hands from dirt, rust, and scrapes.
- Stable Surface: Work on a flat, stable surface. Chocking the wheels of your vehicle if it’s on a jack is crucial. If you’re working on a loose wheel, ensure it can’t roll away.
- Proper Footwear: Avoid open-toed shoes. Dropping a wheel or tool can cause severe injury.
- No Shortcuts: Don’t rush the process or take unnecessary risks. Patience is key.
Methods for Breaking a Tire Bead: From DIY to Pro
Now for the main event! There are several ways to break a tire bead, ranging from ingenious DIY hacks to specialized tools.
1. The “Vehicle Weight” Method (The Classic DIYer’s Trick)
This is a favorite among off-roaders and budget-conscious DIYers because it requires no special tools, just your vehicle. I’ve personally used this method countless times on remote trails where a proper bead breaker was just a distant dream.
What you’ll need:
- Your vehicle (car, truck, SUV)
- A piece of wood (2×4 or similar, about 1-2 feet long)
- A flat, sturdy surface (concrete driveway, packed dirt)
Steps:
- Remove the wheel with the flat tire from your vehicle.
- Remove the valve stem core and ensure the tire is completely deflated.
- Lay the wheel flat on the ground with the side you want to break the bead from facing up.
- Position the wood: Place the 2×4 on the sidewall of the tire, right next to the rim, parallel to the bead. Make sure it’s on the tire and not the rim.
- Drive onto the wood: Slowly and carefully drive one of your vehicle’s tires onto the piece of wood. The weight of the vehicle, concentrated by the wood, will push down on the tire’s sidewall, forcing the bead to separate from the rim.
- Listen for the “pop”: You’ll usually hear a distinct “pop” or “crack” as the bead breaks free.
- Check and Repeat: Lift your vehicle off the wood and check the bead. If it hasn’t fully separated, reposition the wood slightly and repeat the process. You may need to do this in a few spots around the tire’s circumference.
- Flip and Repeat: Once one side is done, flip the wheel over and repeat the process for the other bead if you need to remove the tire completely.
How Long Can You Drive With A Spare Tyre
Pros: Free, uses readily available items, effective for many tires. Cons: Requires careful maneuvering of a vehicle, not always feasible on very soft ground, can be tricky for larger tires, potential for damage if not careful.
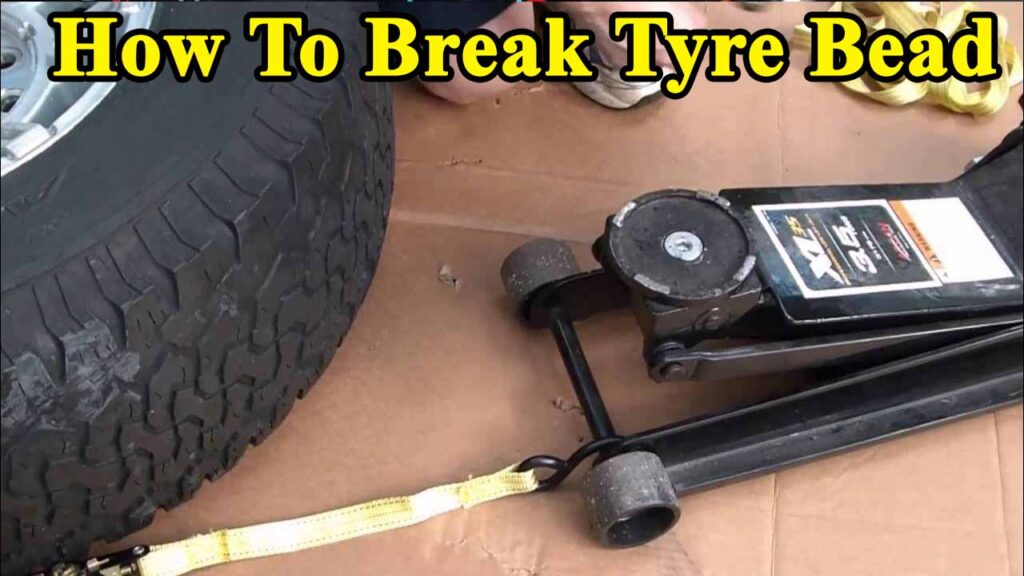
2. The “Jack and Something Pointy” Method (Another DIY Approach)
This method leverages a floor jack or bottle jack and a sturdy object to exert concentrated pressure. I’ve seen this used effectively in situations where the vehicle weight method wasn’t practical.
What you’ll need:
- A floor jack or bottle jack
- A sturdy, somewhat pointed object (e.g., a pry bar, the blunt end of an axe, a specially designed bead breaker attachment if you have one for your jack)
- A piece of wood for protection (optional, but recommended)
Steps:
- Deflate the tire completely and remove the valve stem core.
- Lay the wheel flat on the ground.
- Position the jack: Place the jack on the ground next to the tire.
- Position the “pointy” object: Place your pry bar or other sturdy object onto the tire sidewall, very close to the rim, making sure it’s not on the rim itself. If using a pry bar, position it so the rounded end is against the tire. You can put a small piece of wood between the object and the tire to prevent marking the rubber if you wish.
- Apply pressure: Place the jack head directly onto the pry bar (or whatever object you’re using). Slowly pump the jack, pressing down on the tire’s sidewall.
- Listen and Watch: You’ll see the sidewall compress, and eventually, the bead will separate with a pop.
- Release and Reposition: Once the bead is broken in one spot, release the jack pressure, reposition the “pointy” object, and repeat around the circumference until the bead is fully broken.
- Flip and Repeat: If needed, flip the wheel and do the other side.
Pros: Good for stubborn beads, relatively controlled force application, doesn’t require moving a vehicle. Cons: Can be slow, requires careful placement to avoid rim damage, risk of slipping if the object isn’t stable.
3. The “Manual Bead Breaker Tool” Method (The Workhorse of the Garage)
This is where we move into dedicated tools. A manual bead breaker is a relatively inexpensive and effective tool for home garages and small shops. I consider this a must-have for anyone who frequently works on tires. My first bead breaker was a simple lever-action model, and it paid for itself tenfold.
What you’ll need:
- Manual bead breaker tool (lever-action or clamp-style)
Steps (for a lever-action type):
- Deflate the tire completely and remove the valve stem core.
- Position the tool: Place the wheel flat on the ground. Position the bead breaker so its “foot” or wedge is against the tire sidewall, right next to the rim, and its opposing jaw hooks onto the rim’s edge.
- Engage the lever: Press down on the lever, which will force the wedge down onto the tire, pushing the bead off the rim.
- Listen for the “pop”: The bead will separate with a distinctive sound.
- Reposition and Repeat: Lift the lever, move the tool a few inches around the circumference, and repeat until the bead is fully broken.
- Flip and Repeat: Do the same for the other side if needed.
Pros: Efficient, relatively easy to use, less risk of damaging the rim compared to improvised methods, affordable. Cons: Still requires some physical effort, may struggle with extremely stubborn or very large truck tires.
4. The “Tire Changer Machine” Method (The Professional’s Choice)
For tire shops and serious enthusiasts, a dedicated tire changer machine is the ultimate solution. These machines have powerful pneumatic or hydraulic bead breakers built-in. If you’ve ever had a tire changed at a professional shop, this is likely what they used.
What you’ll need:
- Tire changer machine
Steps (general overview):
- Deflate the tire and remove the valve stem core.
- Mount the wheel securely onto the machine’s turntable.
- Position the bead breaker arm/shovel: The machine has a pneumatic or hydraulic arm with a flat “shovel” or “paddle” designed to push the bead down. Position this shovel against the tire sidewall, near the rim.
- Activate the breaker: Use the foot pedal or lever to activate the breaker. The shovel will press down with immense force, quickly breaking the bead.
- Rotate and Repeat: Rotate the wheel on the turntable and repeat the process until the entire bead is broken.
- Flip and Repeat: Flip the wheel and break the other bead.
Pros: Fastest, easiest, requires minimal physical effort, virtually no risk of rim damage when used correctly, ideal for high volume. Cons: Very expensive, large footprint, not practical for most home users.
5. The “Hammer and Chisel/Wedge” Method (The Last Resort – Use with Extreme Caution)
This is a method I’ve only used in truly dire circumstances, like when a bead is completely rusted solid and other methods fail, and it’s something I advise against for beginners. It carries the highest risk of damaging the rim or injuring yourself.
What you’ll need:
- Large hammer or sledgehammer
- Blunt chisel or sturdy wedge (preferably a dedicated bead-breaking wedge)
- Eye protection, heavy gloves
Steps:
- Deflate the tire completely.
- Lay the wheel flat.
- Position the wedge: Place the blunt chisel or wedge at an angle into the gap between the tire bead and the rim. This requires precision to avoid striking the rim.
- Strike the wedge: With controlled force, strike the back of the chisel/wedge with the hammer. The goal is to drive the wedge inward, forcing the bead away from the rim.
- Rotate and Repeat: Move the wedge around the circumference, striking it gently but firmly until the bead breaks.
Pros: Can break even the most stubborn beads. Cons: High risk of damaging the rim, tire, or injuring yourself. Requires significant skill and control. Generally not recommended unless absolutely necessary and with extreme caution.
Troubleshooting Stubborn Beads
Sometimes, a bead just doesn’t want to budge. Here’s what to do:
- Lubrication: Spray a generous amount of soapy water (or a specialized tire lubricant) around the bead area. This can significantly reduce friction and help the bead slide off. I always keep a spray bottle of soapy water handy; it’s a game-changer.
- Heat (Use with Extreme Caution!): In rare, extreme cases of very old, dry-rotted tires, a small amount of carefully applied heat (e.g., from a heat gun, never an open flame near rubber or flammable lubricants!) might help soften the rubber. This is highly risky and generally not recommended due to fire hazards and tire damage.
- More Force/Different Angle: If one method isn’t working, try another, or apply more concentrated force in a specific area.
- Patience: Don’t get frustrated and resort to reckless tactics. Take a break, come back, and try again.
A Personal Anecdote: The F-250 Bead
I remember a particularly stubborn bead on an old Ford F-250 pickup truck from a farm near Chico. The tire had been on for years, exposed to the elements, and the bead was practically welded to the rusty steel wheel. I tried the vehicle weight method, then the jack method – nothing. Finally, I resorted to a heavy-duty manual bead breaker, but even that struggled. What ultimately did the trick was liberal application of tire lubricant (a really slick, purpose-made gel) and hitting the bead breaker with a sharp, quick motion, rather than a slow, steady push. The “crack!” it made when it finally broke was incredibly satisfying, like winning a small battle. It just goes to show, sometimes it’s not just about brute force, but also about the right technique and a little help from chemistry.
Cost Considerations: What Will This Set You Back?
- DIY (Vehicle Weight/Jack Method): Effectively free, assuming you have the vehicle and basic tools.
- Manual Bead Breaker Tool: You can find these online or at auto parts stores ranging from $30 to $150, depending on the quality and design. A good quality one is a worthwhile investment if you plan to do your own tire work.
- Tire Changer Machine: Entry-level hobbyist machines might start around $500-$1000, but professional-grade pneumatic/hydraulic machines typically cost $2,000 to $10,000+.
- Professional Service: If you take your wheel to a tire shop, they can usually break the bead and remount/balance it for a fee, often ranging from $15-$40 per tire for a simple repair or replacement, excluding the cost of a new tire.
Key Takeaways and Important Values
- Safety First: Always prioritize safety. Deflate the tire completely and wear appropriate PPE.
- Patience is a Virtue: Breaking a bead can be frustrating. Don’t rush it or resort to dangerous methods.
- The Right Tool for the Job: While DIY methods work, a dedicated bead breaker can save you time, effort, and potential damage.
- Understand the “Why”: Knowing how a bead works helps you understand how to break it effectively.
- Value of Self-Sufficiency: Being able to break a tire bead yourself is a valuable skill that can save you money and get you out of a bind, especially when you’re far from a service station.
Conclusion
Breaking a tire bead might seem daunting at first, but with the right knowledge, tools, and a bit of practice, it’s a skill well within the reach of any DIY enthusiast. Whether you’re using the ingenious weight of your vehicle, a simple manual tool, or a professional machine, the key is understanding the mechanics and prioritizing safety. So, the next time you face a flat tire, you’ll be armed with the confidence and expertise to tackle that stubborn bead, save some money, and gain a tremendous sense of accomplishment. Happy wrenching!
FAQ: Your Bead-Breaking Questions Answered
Q: Can I break a tire bead without removing the wheel from the vehicle? A: While theoretically possible for some methods (like the vehicle weight method), it’s significantly harder and riskier. It’s highly recommended to remove the wheel for safety and ease of access.
Q: How much pressure does a tire bead hold? A: Tire beads typically hold pressures ranging from 30-80 PSI for passenger vehicles, and much higher for heavy-duty trucks or specialized equipment. This pressure creates a very strong seal, making bead breaking challenging even after deflation.
Q: Will WD-40 help break a tire bead? A: WD-40 or similar penetrating oils can help with rust and corrosion, but a dedicated tire lubricant (like soapy water or specialized tire mounting paste) is usually more effective for reducing friction on the rubber itself.
Q: Can I reuse a tire after breaking the bead? A: Yes, absolutely! Breaking the bead is a standard procedure for tire repair or replacement. As long as you don’t damage the bead or the tire sidewall during the process, the tire is perfectly reusable (assuming it’s still roadworthy otherwise).
Q: Is it safe to use starting fluid to break a bead? A: Absolutely NOT. Using starting fluid (ether) and igniting it to seat a tire bead is extremely dangerous, illegal in many places, and can lead to severe burns, explosions, and tire damage. This is a very reckless practice and should never be attempted. Always use a proper air compressor to seat beads.
Q: How do I know if the bead is completely broken? A: You’ll usually hear a distinct “pop” or “crack” as it separates. Visually, you’ll see a noticeable gap between the tire bead and the rim all the way around the circumference. You should be able to easily push the sidewall away from the rim.
Q: What if I accidentally damage the rim or tire bead? A: If you visibly damage the bead (e.g., tears, kinks in the wire), the tire is compromised and should not be reused. If you significantly damage the rim, it may no longer be safe to use and could lead to air leaks or tire failure. In either case, consult a professional tire shop.